Thursday, November 17, 2011

How to - - - Remove ANNOYING blogspot Navbar

I really don’t understand the reason of that Navbar on the top of your blog.... I have never used it…

Really I want to know, what is the right way of using it, educate me if you use it…. I will love to know
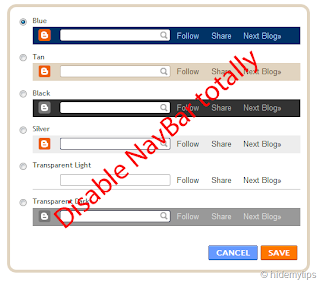


You have two options with Navbar....
1. you can move it to bottom... (which doesn’t sound like a kool idea to me…)
2. Secondly to disable it.

My post is about disabling it... as I wanted to get rid of it...

OK lets start....


Step 1

Dashboard -> Design -> Edit TML


Step 2

Search (Ctrl+F) and find following code in HTML code.

]]></b:skin>


Step 3

Now add following code "above" ]]></b:skin>
#navbar-iframe { height:0px; visibility:hidden; display:none; }
It will look like this
#navbar-iframe { height:0px; visibility:hidden; display:none; }
]]></b:skin>

Save & DONE!

happy blogging
sig11

Spam Traffic on blogspot

Hay all....

Weeken Weekend Weekend....

I was so busy I had no plans to upload any post today but this thing was really bugging me and really wanted to share that...

Most of you must be facing this already, but it started with me yesterday.


Yesterday when I checked my blog traffic status in the morning (luv to do dat:) it was overwhelming... around 1000 hits in 1 day... I couldnot believe it.... but it was not showing in the posts, just in over all number and the source were....

http://www.googlecrrection.com
http://www.777seo.com/seo.php?username=martyxmas&format=ptp
http://www.justforlaughsgags.tv

I checked all these sites and they all took me to same page and there was nothing linked to my page...

Today again it was same, had too much traffic... from these same links.

And now, I have started having bugs in my system :(, some pages turn dark and dont open at all...

Today I checked on google and here I found some information.

Its a blogger spam....JUST DONT CLICK ON THE LINKS... it cannot control your blog as it is password secured but it can leave harmful cookies on system.... which can create problems...


It is very annoying but we cant do much about it.... but to wait for google to stop it... hope we get rid of this soon...

BE CAREFUL...


Wednesday, November 16, 2011

Am I obsessed with "HOW TOzzz" hmmm

Enough of blogging tips....

Now a days I am working on my blog's designing & layout... so you will be seeing a new look of DUBAI CRAFTER MOM soon :). Secondly in next few days ill be uploading tutorials on blog designing, adding background, designing and adding blog buttons, adding facebook,email,pinterest links, adding tutorial pages to blog, arranging tutorial page attractively and alot...


OH YA one thing more... all the designing I have done WITHOUT USING PHOTOSHOP... I had  been working in photoshop and its extremly fun but dont have it installed in my system now so this time I took help from

Microsoft paint
Microsoft word
& the amazing Picnik

and it worked well :)

I am no expert, but learnt alot of QUICK, EASY, TRICKY ways of getting a new personalized look for your blog in last few days, while customizing my blog... & will be sharing that.


So mail me at irum.adnan@gmail.com if there is anthing you would like to share or teach me....

Stay Blessed


Tuesday, November 15, 2011

How to - - - watermark your pictures, the quickest way?

I started blogging in April this year…. in march I read a post by Khadija, Creative mind that her tutorial pictures were stolen as they were not marked with her name…. & she was very sad about that…. we can understand how she would have felt :(

watermark pictures, quick way to watermark pictures, easy way to watermark pictures, simplest way to watermark your pictures, watermark pictures tutorial

Since then I started marking my pictures too…. Until now I have been using two ways

1. Picnik…. you can check here, Khadija has excellent post on that.
2. And I tried Microsoft paint another good option, I like it as my camera pictures are quite heavy… I mean really heavy, 5MB to 6MB so by using paint,
* you can easily resize your pictures, using “print screen” option (let me know if you need help with that)
* & label your pictures…
so it’s a kool option BUT again time taking…. as you have to upload 1 picture at a time in both cases (picnik or paint) which means patience…. and I DONT HAVE THAT….
Recently I started using Windows Live writer and came to know about its watermark option…. its so easy….

check out….
Step 1
upload your picture…
watermark pictures, quick way to watermark pictures, easy way to watermark pictures, simplest way to watermark your pictures, watermark pictures tutorial

2. Select Picture, and you will see Picture Tools->Format->watermark option, select that
watermark pictures, quick way to watermark pictures, easy way to watermark pictures, simplest way to watermark your pictures, watermark pictures tutorial

Step 3 Add your text, font, size & position.
watermark pictures, quick way to watermark pictures, easy way to watermark pictures, simplest way to watermark your pictures, watermark pictures tutorial

AND DONE…………
watermark pictures, quick way to watermark pictures, easy way to watermark pictures, simplest way to watermark your pictures, watermark pictures tutorial

Which means you upload pictures in your post & then watermark them, just by this simple way…

Please let me know if you know any quicker way then this…..
Happy blogging
sig11

Sunday, November 13, 2011

How to - - - Increase Traffic to your blog by adding “Alt” to your pictures

There are a lot of long I mean really long articles on how to increase traffic to your blog, this and that… and yes they are helpful but bit difficult to understand & implement for a non-techie person (like me :)

8increase_blog_traffic

There is one little simple trick which is not very techie and it really works…. after implementing this I saw a HUGE difference in traffic to my blog…

OK! No more exaggeration I am talking about adding “alt” tag to your pictures…

What is “alt” tag? It is simply adding description code of your picture (you upload on your blog) in HTML….

How it can improve traffic? Ok, ill explain with an example, I have this Monster Hook post on my blog, with a lot of pictures and I have named these pictures like 1.jpg or hook.jpg or may be 101239.jpg

Increase-blog-traffic, simple method to increase blog traffic, by adding alt tags to pictures

And some one search Google images for “diy kids craft” or “kids monster wall hook” will not see my pictures….. As Google bots are looking for diy kids craft/kids monster wall hook and not 1.jpg or hook.jpg or 101239.jpg

Make sense?

Adding “alt” tag to pictures… Ok so now, lets talk about how to do that…. there are 2 ways
1. If you are using windows Live writer then, once you add picture, you get the formatting option and there you can see “Add alt” option. add relevant info… SIMPLE!

Increase-blog-traffic, simple method to increase blog traffic, by adding alt tags to pictures

2. In other case if you are using blogger for posting, then you need to add tag in HTML manually….

once the picture is uploaded in your blog post, go to HTML.

del1

Now search <img

del2

Just after <img add space then alt=“your tag” and single space
for example, for this picture I will add…

11

img alt="monster hook, kids fun, kids diy, kids craft, kids wall hanging" border="0"

del3

This way your pictures will be visible in all relevant Google searches….
Please let me know if I can help you with anything…
Happy Blogging,

Saturday, November 12, 2011

How to - - - make/add signature in the blogspot post

Lets talk about making & adding signatures in blogspot post.... Adding signature is a fun way of personalizing your posts and it is very easy.


First, Making signature, there are alot of softwares and websites available which offer signature making for free... but they offer limited fonts & designs... this is the signature I got from some website (dont remember the site name).


This time I worked on picnik to make my signature... and I am happy with the results.


For the first signature I used a lined pattern for background, which is not a picnik option, I drew it in paint and uploaded it...

Last two are completely made in picnik.... 

Ok so once finalized, save it in .jpg format on your pc.


Now coming to the second part, Adding Signature in blogspot post, again, a very easy pizy thing, you just have to follow these following instructions.

Make a post and upload your signature. Dont publish post...


Now from "edit HTML" option copy text. (Dont publish)


In a new window open you blogger dashboard and select "Settings" from options`


Now Select "Formating".


Now scroll down & paste your HTML code (you copied earlier). In the end click "Save settings" and you are DONE!


Now whenever you will open a new post, your signature will be there already.... no need to upload everytime....

Enjoy customizing your blog.


Friday, November 11, 2011

How to - - - Stop blogger background from scrolling

Few days back I friend asked me how I made my blog and I really couldnot recall...
It was a simple thing but I dont remember how I inserted the template, buttons and all, so I made a new blog and started working on it Just to learn about customizing blog according to your style...

And It is incredibly simple and fun...


It looks nice when you go down on a blog but the background stay there... I like it, and there are two easy ways of inserting this opion in your blog


OPTION 1

Select "Design" option from the Dashboard

Select Template Designer

Select background

Uncheck the "scroll with page" option

"Äpply to blog"

Ta daaa! done...

Ok now in case you have difficulty following this, there is another option....

OPTION 2
Same like before, select design from dashboard
Select "Edit HTML" option
Now search word "scroll" on the page (by pressing CTRL & F, you will get a search page option on the top of your page). Change all the "scroll" words in HTML code to "Fixed".

SIMPLE..... isnt it!

Enjoy customizing your blog, your way....